Your Home Deserves a Painter You Can Trust
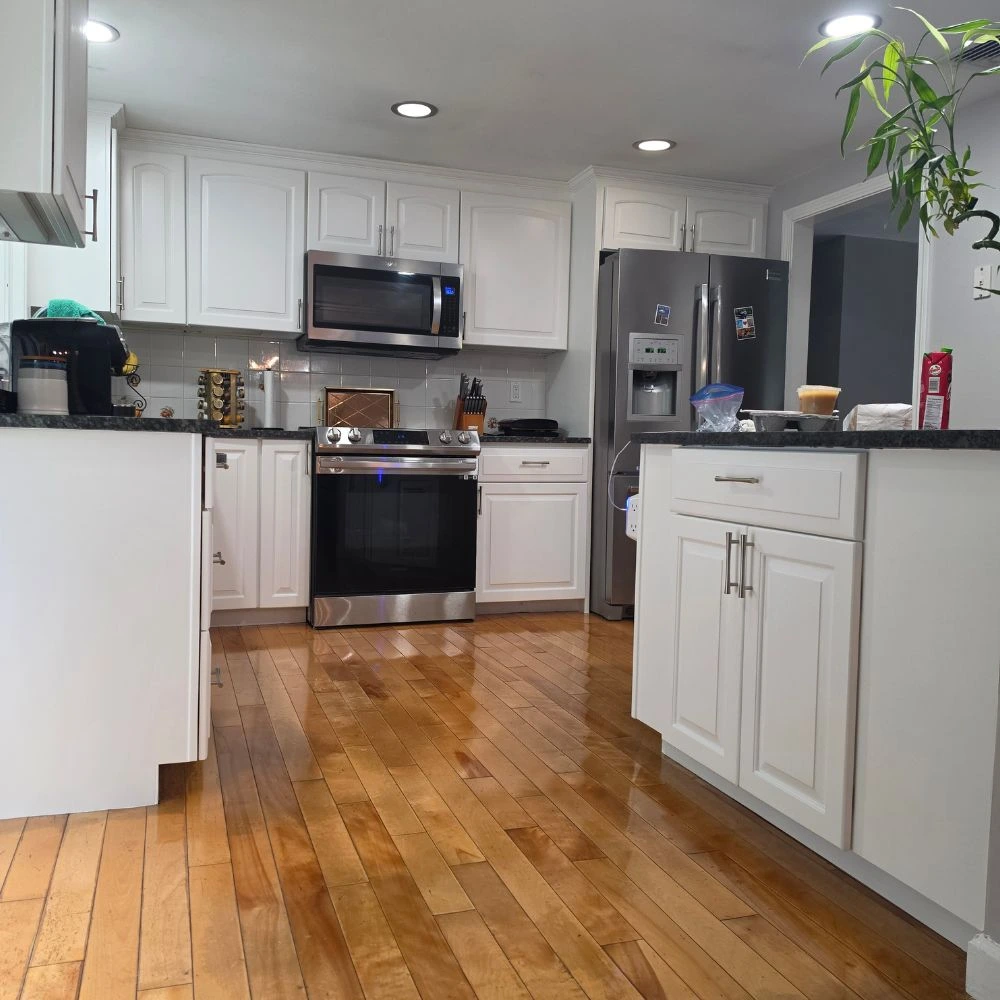
The best paint for kitchen cabinets without sanding is usually a durable cabinet and trim enamel paired with a compatible bonding primer. The right combination depends on the existing finish, surface condition and product instructions. You can often avoid extensive sanding, but you should still remove grease, prepare the surface and confirm that the primer and paint will adhere properly.
TL;DR
- Best overall approach: Clean the cabinets thoroughly, apply a bonding primer approved for the existing surface and finish with a durable cabinet enamel.
- Best for previously painted cabinets: A cabinet and trim enamel compatible with the existing coating, provided the old paint is sound and clean.
- Best for slick varnished or glossy cabinets: A bonding primer specifically approved for that surface, followed by a compatible cabinet finish.
- Best for laminate cabinets: A primer explicitly labeled for laminate or other nonporous surfaces, followed by a compatible enamel.
- What to avoid: Ordinary wall paint, painting over grease and assuming that a product labeled no sand will stick to every cabinet finish.
- Important limitation: Peeling paint, damaged veneer, swollen MDF and failing clear coats may require scraping, sanding, repairs or replacement before painting.
The key is to distinguish between avoiding extensive sanding and skipping surface preparation. Those are two very different things.

Can You Paint Kitchen Cabinets Without Sanding?
Yes. Many kitchen cabinets can be repainted without sanding the entire surface down to bare wood. The most important requirements are a clean substrate, a stable existing finish, suitable primer when needed and a topcoat that can withstand regular kitchen use.
Sanding traditionally helps remove loose coating, smooth imperfections and create a surface that new paint can grip. However, some modern bonding primers are formulated to adhere to difficult surfaces with minimal or no sanding when the manufacturer’s preparation instructions are followed. This makes a lower dust cabinet repaint possible in many homes. It does not eliminate every preparation step.
When a no sanding approach can work
You may be able to skip routine sanding when:
- The existing paint or clear coat is firmly attached.
- The surface is free from cooking grease, wax, polish and cleaning product residue.
- The cabinet doors are structurally sound and have no significant peeling or blistering.
- The selected primer is approved for the existing material and finish.
- The primer and topcoat are compatible and applied within their specified recoat windows.
A cabinet door with an intact painted finish may need thorough cleaning, light surface preparation if required and a suitable cabinet enamel. A glossy varnished door may need a different primer because its smooth surface presents a greater adhesion challenge.
When skipping sanding is a bad idea
A no sanding method is less suitable when the existing coating is flaking, cracked, chalky or poorly bonded. Applying new paint over a failing finish does not repair the underlying problem.
You may also need sanding or other mechanical preparation to remove raised grain, rough repairs, old drips, damaged coating edges or an uneven finish. Water damaged cabinet materials may need repair or replacement rather than another coat of paint.
A practical rule: If the old finish is sound, focus on cleaning and adhesion. If the finish is failing, address the failure before applying anything new.
What Is Best Paint for Kitchen Cabinets Without Sanding?
For most homeowners, the best choice is a cabinet specific enamel used over a compatible bonding primer. This combination addresses two separate needs: the primer helps the new coating adhere to the existing surface, while the enamel provides the finished color, sheen and protective film.
There is no single paint that works equally well on every cabinet. The best option depends on whether the doors are painted wood, stained oak, varnished maple, MDF, thermofoil or laminate.
Cabinet paint vs bonding primer vs ordinary wall paint
These products serve different purposes.
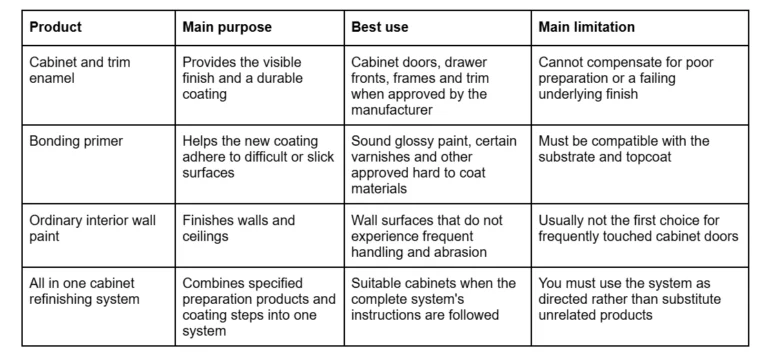
A bonding primer is particularly important when you want to avoid sanding. For example, Sherwin Williams describes its Extreme Bond Primer as suitable for many clean, paintable, hard to coat surfaces, with sanding potentially unnecessary in many cases. The manufacturer still emphasizes proper surface preparation and recommends testing adhesion before proceeding.
What to look for in cabinet paint
When comparing paints, look beyond the color name or the words kitchen and bath on the label. Check for these qualities:
- Durability: The finish should withstand frequent handling, routine cleaning and contact with kitchen items.
- Washability: Cabinet doors collect fingerprints, food splashes and grease. The coating should tolerate cleaning according to its care instructions.
- Leveling: Paint that levels well can reduce visible brush marks and roller texture.
- Adhesion compatibility: The finish must be approved for the selected primer and intended substrate.
- Recoat and cure requirements: A coating that feels dry quickly may still need several days or longer to develop its intended hardness.
For most painted kitchen cabinets, a satin or semi gloss cabinet enamel is a practical starting point. Satin has a softer appearance and can help make minor surface imperfections less conspicuous. Semi gloss reflects more light and is often easier to wipe clean, but it can also highlight dents, uneven repairs and application marks.
Neither sheen guarantees durability on its own. The quality of the coating, preparation, application and curing all matter.
Best Paint Options and Bonding Primers
The following options represent different approaches rather than a universal ranking. Product availability and formulations can change, so verify the current label and technical data sheet before purchasing.
1. Sherwin Williams Extreme Bond Primer with a compatible cabinet enamel
Extreme Bond Primer is formulated for adhesion to many hard to coat surfaces. That makes it worth considering for sound, previously finished cabinets when the product’s current instructions permit the specific substrate.
Its main advantage is that it may allow you to avoid sanding a clean, paintable surface. That does not mean you can coat greasy doors or paint over loose varnish. The primer must still be applied to a properly prepared surface.
Advantages
- May eliminate sanding on suitable, properly prepared surfaces.
- Can help the finish coat adhere to difficult substrates.
- It is intended to work with compatible finish coats.
Limitations
- It is a primer, so a suitable cabinet finish is still needed.
- It is not automatically appropriate for every plastic laminate, thermofoil or damaged surface.
- The manufacturer recommends testing adhesion before coating the full project.
For a homeowner trying to reduce sanding, this is a reasonable starting point when the existing cabinet finish is intact and the product’s technical instructions support the application.
2. Benjamin Moore ADVANCE Interior Paint
ADVANCE is a waterborne alkyd coating commonly used for interior trim and cabinetry. It is worth considering when a smooth, refined finish is a priority.
However, ADVANCE is not a substitute for a bonding primer when the existing finish requires one. Benjamin Moore’s technical data sheet specifies surface preparation requirements, including sanding glossy alkyd coatings. The correct preparation therefore depends on the surface you have, not simply the paint you buy.
Advantages
- Suitable for cabinetry and trim applications when the surface is properly prepared.
- Can produce a smooth appearance with careful application.
- Available in multiple finishes.
Limitations
- Recoat times can be longer than those of some waterborne coatings.
- Full hardness develops over time.
- Glossy existing alkyd finishes may require sanding, even if your goal is to avoid it.
Choose this option when product’s preparation requirements fit your cabinets and you can allow sufficient drying and curing time.
3. A dedicated cabinet refinishing system
A dedicated cabinet refinishing system can be an alternative to buying a separate primer and paint. Rust Oleum’s Cabinet Transformations instructions describe a preparation process that uses a supplied deglosser and scrub pads instead of conventional sanding or priming for the specified system.
The important distinction is that no sanding does not mean no preparation. The system still requires careful cleaning and completion of its prescribed steps. Its instructions also call for sanding repaired cracks, holes and gouges smooth before continuing.
Advantages
- Provides a defined preparation and coating process.
- Can reduce the need for conventional sanding on eligible surfaces.
- May simplify product selection because the components are intended to work together.
Limitations
- You must follow the specific system instructions.
- It may offer different finish and color options from a standalone cabinet enamel.
- It is not a remedy for structurally damaged or poorly bonded cabinet material.
Before buying a kit, check that the current version is intended for your cabinet material and existing finish.
4. Other cabinet and trim enamels
Many paint manufacturers offer waterborne acrylic, urethane modified or alkyd cabinet and trim coatings. These can be suitable choices when paired with the correct preparation and primer.
Do not assume that every product described as enamel is interchangeable. Enamel is a broad coating term, not a guarantee of a particular formulation, adhesion level or cure time.
Read the product’s technical data sheet to determine whether it is intended for cabinets, what primers it accepts, and how long it needs before normal use. When a product does not explicitly support the surface in question, ask the manufacturer or a paint specialist before applying it.
Book Your Free Estimate Today!
Ready to transform your space? Our team is here to help you get started with a no-obligation, on-site estimate. Whether it’s a quick refresh or a full makeover, we’ll guide you every step of the way.
How to Choose Paint for Your Existing Cabinet Material
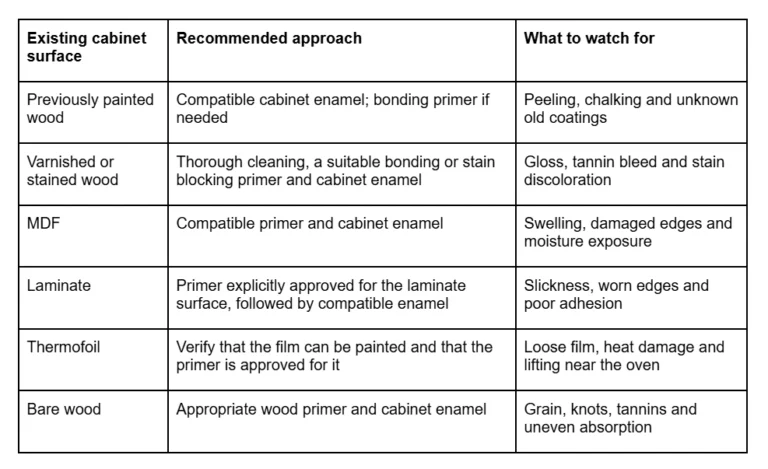
The cabinet material matters as much as the paint. A product that adheres well to previously painted wood may not adhere to a plastic coated cabinet door.
Previously painted cabinets
If the existing paint is firmly bonded, you may be able to clean the surface, test a bonding primer and apply a compatible cabinet enamel without sanding the entire door.
Check the edges, corners and areas around the handles. These places often reveal peeling or wear before the broad, flat surfaces do.
If the old paint is lifting, remove the loose material and feather the damaged edges as necessary. New paint cannot reliably hold a failing layer in place.
Varnished or stained wood cabinets
Varnished wood can present two problems: a slick clear coat that makes adhesion difficult and natural wood compounds that may discolor the new paint.
A bonding primer addresses adhesion when the product is approved for that surface. A stain blocking primer may also be necessary if tannins, knots or old stains can bleed through the finish. Some products perform both functions, but you should verify that capability rather than assume it.
If you want to avoid sanding, look for a primer specifically suited to the existing clear coat and test it before treating all the cabinets. If the selected system requires dulling the glossy finish, follow that requirement.
Laminate and thermofoil cabinets
Laminate and thermofoil require extra caution because their outer surfaces are not the same as bare wood.
A suitable bonding primer may work on sound laminate, but the exact material and coating system matter. Test adhesion in an inconspicuous area and allow the coating to dry as directed before evaluating the result.
Thermofoil doors are particularly challenging if the plastic film is separating from the substrate. Painting over loose film will not fix the underlying bond. Heat damaged areas near ovens and other appliances may also need repair or replacement.
If you cannot identify the surface, take a door or drawer front to a paint supplier for help identifying the material and selecting compatible products.
Book Your Free Estimate Today!
Ready to transform your space? Our team is here to help you get started with a no-obligation, on-site estimate. Whether it’s a quick refresh or a full makeover, we’ll guide you every step of the way.
How to Paint Kitchen Cabinets Without Sanding
The following process minimizes sanding where the existing finish and selected coating system allow it. Product instructions take precedence over any general sequence because cleaners, primers and paints can have different application requirements.
Step 1: Inspect the cabinets before buying paint
Check the doors, drawer fronts and cabinet frames for:
- Peeling or cracked paint.
- Grease buildup around the range and cooking area.
- Water damage near the sink and dishwasher.
- Loose veneer or thermofoil.
- Deep scratches, dents and old paint drips.
- Signs that the existing coating is not firmly attached.
Identify the cabinet material and, if possible, the existing finish. This determines which preparation method and primer are suitable.
Step 2: Remove doors, drawers and hardware
Remove the doors and drawer fronts, then take off the knobs, pulls and hinges where practical. Label each door and its corresponding opening so you can reinstall everything correctly.
Set up a clean, level work area for the doors. Protect nearby surfaces and keep dust, cooking residue and other contaminants away from the coating area.
Painting doors while they are laid flat can make it easier to achieve an even finish and reduce runs on vertical surfaces.
Step 3: Clean away grease and residue
This step is essential, even when sanding is unnecessary. Kitchen cabinets collect oil from cooking, fingerprints, food splashes and residue from household cleaners. These contaminants can interfere with primer adhesion and create defects in the new finish.
Use a cabinet safe degreasing cleaner according to its label. Pay particular attention to the areas around handles, above the range and beside the sink. After cleaning:
- Rinse if the cleaner’s instructions require it.
- Remove all cleaner residue.
- Allow the surfaces to dry completely.
- Check for any remaining greasy or slippery areas before continuing.
Do not apply primer over a surface that merely looks clean. Cleaning must remove the contaminants that could compromise the coating. Step
4: Repair defects and prepare the surface
Fill suitable dents, small holes and unused hardware holes with a compatible filler. Let the repairs dry fully, then sand the repaired areas smooth.
This localized sanding does not mean you must sand every cabinet door. If the existing coating is glossy, check whether the selected primer permits application without sanding. Some bonding primers do; other coating systems still require the surface to be dulled. Remove any dust from repairs and ensure the surface is clean and dry before priming.
Step 5: Test the primer in an inconspicuous area
Before committing to the whole kitchen, apply the selected bonding primer to a small, prepared area. Follow the manufacturer’s instructions for application, drying and recoating. Allow the primer to develop sufficient adhesion before testing it. Do not judge the bond simply because the surface feels dry. Inspect the test area for problems such as:
- Wrinkling or lifting of the old coating.
- Poor coverage or uneven absorption.
- Easy scraping or peeling of the new primer.
- Discoloration bleeding through the coating.
A small test cannot guarantee long term performance, but it can reveal obvious incompatibility before you invest time in the entire project.
Sherwin Williams recommends testing its Extreme Bond Primer in an inconspicuous location before proceeding with a full cabinet application.
Step 6: Apply the compatible primer
Once the test confirms that the system is suitable, prime the prepared surfaces according to the product instructions.
Use the recommended application tool and film thickness. Applying an excessively heavy coat does not necessarily improve adhesion and can cause runs or uneven drying.
Make sure you cover the cabinet frames, door edges and other areas that will receive the finish coat. Follow the label’s drying and recoat times before painting.
If the old finish or substrate requires a stain blocking primer rather than a standard bonding primer, use the appropriate product for that problem. Adhesion and stain blocking are different functions, even when a primer offers both.
Step 7: Apply cabinet enamel in thin, even coats
Use a quality brush for corners, profiles and edges and a small, suitable roller for broad flat surfaces. A sprayer can also produce a smooth finish, but it requires suitable equipment, masking, ventilation and application control. For a brush and roller application:
- Work in manageable sections.
- Avoid repeatedly brushing paint as it begins to set.
- Maintain a wet edge where practical.
- Check corners for drips and accumulated paint.
- Apply the next coat only when the product permits it.
Two finish coats are commonly used for cabinet repainting, but the correct number depends on the product, color change, coverage and manufacturer’s instructions. Do not force a second coat onto a surface that has not reached its specified recoat stage.
Step 8: Allow the finish to cure before normal use
Drying and curing are not the same thing. A coating may be dry enough to touch within hours while remaining vulnerable to scratches, sticking and pressure marks. Full hardness and adhesion can develop over days or longer, depending on the product and environmental conditions.
Benjamin Moore’s ADVANCE technical data sheet, specifies a 16-hour recoat time under its stated test conditions and notes that optimum hardness and final sheen can take up to 30 days, depending on conditions. These figures apply to that product, not every cabinet paint. During curing:
- Avoid scrubbing the new finish.
- Do not let doors press tightly against one another.
- Wait before loading shelves or placing heavy objects against painted surfaces.
- Reinstall hardware carefully to avoid scratching the coating.
- Follow the product’s specific guidance for returning cabinets to service.
Patience at this stage helps protect the finish you have just applied.
Book Your Free Estimate Today!
Ready to transform your space? Our team is here to help you get started with a no-obligation, on-site estimate. Whether it’s a quick refresh or a full makeover, we’ll guide you every step of the way.
When You Still Need to Sand or Prepare the Surface
Avoiding sanding can save time and reduce dust, but it should never come at the expense of adhesion or surface quality.
Glossy surfaces that the primer cannot adequately grip
Some bonding primers can adhere to glossy surfaces with minimal preparation. Others require scuff sanding. If the technical data sheet specifies sanding, follow that instruction rather than assuming the primer will eliminate the need.
Sherwin Williams’ guidance on painting over hard, slick surfaces explains that these surfaces can cause peeling when the coating cannot establish adequate adhesion. It recommends cleaning, removing loose paint, dulling glossy surfaces where necessary and using an appropriate bonding primer when needed.
Peeling, cracked or poorly bonded paint
Remove loose paint before applying a new coating. Sanding may be necessary to smooth the transition between intact paint and exposed material.
If large areas of paint are failing, determine why before repainting. Moisture, contamination or an incompatible previous coating can cause recurring problems.
Rough repairs and damaged wood
Filler repairs often require sanding to create a smooth surface. Bare wood, damaged veneer, exposed MDF and rough edges may also need localized preparation.
The goal is not to eliminate every instance of sanding. It is to avoid unnecessary sanding while completing the preparation needed for a sound finish.
Older cabinets and potential lead paint
If your home was built before 1978, older painted surfaces may contain lead. Sanding or scraping can release hazardous lead dust.
The U.S. Environmental Protection Agency recommends lead-safe practices for renovation work that disturbs potentially lead containing paint and advises homeowners to use qualified lead safe professionals when appropriate. Review the EPA’s lead safe renovation guidance before disturbing old coatings.
Common Mistakes to Avoid When Painting Cabinets Without Sanding
Even a suitable primer and cabinet enamel can fail if the preparation or application is wrong.
1. Painting over grease. Degreasing is essential, especially near the stove and handles. Paint does not bond reliably to cooking residue.
2. Assuming every bonding primer works on every surface. Read the label and technical data sheet. Confirm that the product is suitable for the specific cabinet material and compatible with the intended topcoat.
3. Using ordinary wall paint as the default choice. Wall paint is formulated for different types of use. Cabinet specific coatings are generally a better starting point for doors and drawer fronts that receive frequent handling and cleaning.
4. Skipping primer because the paint claims to adhere well. Some products are formulated for direct application to specified surfaces, but that does not make them universally suitable. Follow the manufacturer’s complete system recommendations.
5. Applying thick coats to finish faster. Excessive film thickness can cause runs, uneven drying and surface defects. Use the recommended application rate and coat thickness.
6. Reinstalling doors too soon. Fresh paint can stick to bumpers, frames, and adjacent doors before it reaches sufficient hardness. Follow the cure instructions and avoid unnecessary contact during this period.
7. Ignoring loose thermofoil or water damaged MDF. Paint cannot restore a failing substrate. Repair or replace damaged components before applying a new finish.
8. Skipping the test patch. A small trial helps identify adhesion or compatibility problems before they affect the entire kitchen.
When Is Professional Cabinet Painting Worth Considering?
A DIY no sanding project may be reasonable when the cabinets are in good condition, the material is identifiable and the chosen coating system is straightforward to apply.
Professional preparation becomes more valuable when the kitchen has a mix of wood, laminate and previously painted surfaces; when old coatings are failing or when the finish needs to look consistent across detailed doors and large flat panels.
The same applies when you need extensive repairs, have concerns about older paint or cannot take the kitchen out of service for a long curing period.
Pro A&M Painting helps homeowners in Clinton, Worcester County and surrounding Massachusetts communities evaluate painting needs and choose a suitable approach for their projects. If you are uncertain whether your cabinets can be repainted without extensive sanding, discussing the existing finish and its condition with a painting professional can help you avoid investing in a coating system that is unlikely to work.
Conclusion
The best paint for kitchen cabinets without sanding is not necessarily the product with the strongest no sand claim. It is the coating system that works with your existing cabinet material, provides dependable adhesion and produces a finish that can withstand everyday kitchen use.
Start by identifying the cabinet surface and checking its condition. Clean away grease, repair damage and select a bonding primer when the existing finish requires one. Then apply a compatible cabinet enamel and allow it to cure according to the manufacturer’s instructions.
If the cabinets have peeling paint, failing laminate, water damage or an unknown old finish, resolve those issues before painting. A little preparation now can prevent a much larger refinishing job later.
For homeowners planning a kitchen cabinet repaint in the Clinton or Worcester County area, Pro A&M Painting can discuss the condition of the existing cabinets and the preparation a successful finish may require.